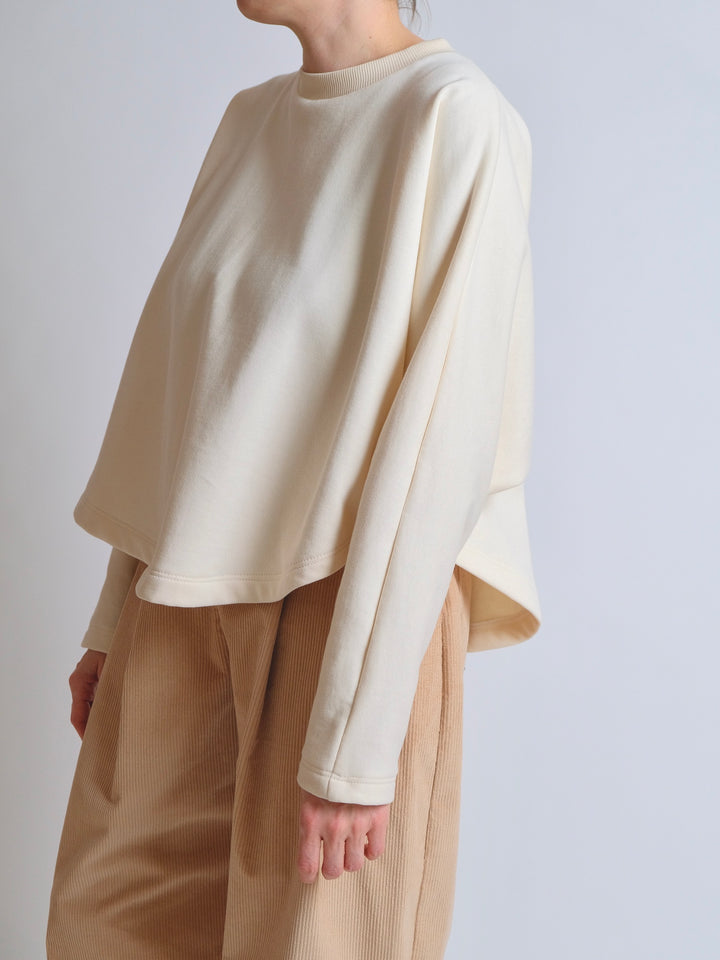
SEWING THE CROPPED SHIRT - IN FULL
This is a step by step look at making the ZW Cropped Shirt IN FULL and includes instructions for the gather sleeve hack.
S T E P 1 : S H O U L D E R S
ALL SIZES
Place the front and back body pieces right sides together and sew the shoulder seams. Overlock the seams together and press towards the back.


S T E P 2 : SIDE SEAMS
*SIZE ONE ONLY*
Cut further into your underarm notch approximately 1 cm / 3/8”. Sew the side seams from the underarm notch to the hem with right sides together, making sure you start exactly at the underarm notch point. Overlock the seams together and press to the back.


S T E P 2 : SIDE SEAMS
*SIZE TWO ONLY*
Sew the straight edges of the side seam inserts to the front side seams, right sides together, matching the notches. Overlock the seams together and press towards the back. Cut further into your underarm notch approximately 1 cm / 3/8”. Sew the side seams together, right sides together, making sure you start exactly at the underarm notch. The side seam insert should be eased in slightly to fit the back side seam. Overlock the seams together and press towards the back.


S T E P 3A : PREPARING SLEEVES
ALL SIZES
Fold sleeves in half lengthways, right sides together, and stitch the underarm seams together. Press the seams open. Fold the sleeves in half vertically, wrong sides together, to create a band and press. Do a stitch all the way around, approximately 8mm / 0.3” away from the edge, to hold together the raw edges.
*If you are sewing the Gather Sleeve Hack you do not need to make a double sleeve band, instead sew your underarm seams, right sides together, then overlock your seams together and press to the back, then continue to STEP 3 B.


S T E P 3B : INSERTING SLEEVES
ALL SIZES
Sew the sleeve bands to the armholes matching the underarm sleeve seam to the underarm notch of the body. You will need to make sure the side seam is angled at a right angle to the armhole seam so that it doesn’t pucker at the underarm point (see images below), and so the sleeve moves freely. Overlock the seams together leaving a short tail of overlocking. Secure the tail of overlocking neatly against the seam with a few stitches so it doesn't unravel. Press the armhole seams up into the body.
*If you are sewing the Gather Sleeve Hack you insert the sleeve in the same way, the only difference is that it is one layer (not a double band). Once you have inserted the sleeve you can continue with the remaining steps and then finish your sleeve hem and band by following the instructions at the end.


S T E P 4A : BACK HEM FACING
ALL SIZES
Press one long edge and both short side edges of the back hem facing in to the wrong side, 1 cm / 3/8”. Sew the other long straight edge of the facing to the back hem, matching the CB notches, with right sides together.
*Please note the back hem facing piece can vary in side depending on the garment size and fabric width you use so this piece may not look exactly the same for every shirt.


S T E P 4B : SIDE SEAM FACINGS
*SIZE ONE ONLY*
Press the diagonal edges of the side seam facings in 1 cm / 3/8” to the wrong side and press the top edge of the triangle down approx 5 cm / 2”. Stitch the straight edge of the facings to the front side seams, right side facing to wrong side front, starting approx 17 cm / 6.5 “ up from the hem. Trim away any excess at the top of the facing triangle then press the facings to the back. Under stitch on the facing close to the side seams, stitching through the facing and side seams only.
Neatly press and pin the facing in place against the back body.


S T E P 4C : SEWING THE HEM
*SIZE ONE ONLY*
Press the hem up 1cm / 3/8” all the way around. Press the hem up a second time to the notch, all the way around. Pin the hem in place, with side seam facings tucked inside your hem and the back hem facing pressed up. Top stitch the hem down, making sure you turn and follow the line of the rectangular facing at the centre back. Lastly top stitch down the diagonal edge of each side seam facing through all layers.


S T E P 4C : SEWING THE HEM
*SIZE TWO ONLY*
Press the hem up 1cm / 3/8” all the way around. Press the hem up a second time to the notch, all the way around. Pin the hem in place, with side seam facings tucked inside your hem and the back hem facing pressed up. Top stitch the hem down, making sure you turn and follow the line of the rectangular facing at the centre back. The hem may need to be eased on slightly along the side seam insert section.


S T E P 5 : BACK NECK FACING
ALL SIZES
Press in the curved edge of the back neck facing to the wrong side 8mm / 0.3”. Top stitch the straight edge of the facing to the top of the back neck, wrong sides together. Top stitch down the curved edge of the facing to the back body, through all layers.


S T E P 6A : PREPARING THE NECK BAND
ALL SIZES
Stitch the CB seam of the neck bands together, matching the double notches, then press the seams open. You now have your full length neckband. Next fold back each end, equally in half lengthways, with right sides together, and stitch across with 1 cm / 3/8” seam allowance. Turn out the ends neatly to the right side.
*ADDITIONAL INSTRUCTIONS FOR SIZE TWO: Your neck band will be in 4 pieces instead of two. Stitch the CB neck band pieces (G) together, matching the double notches, with 1.5cm / 5/8 inch S/A. Press the seams open. Next attach your lower neck band pieces (F) to the CB neck bands matching triple notches with 1cm/ 3/8” S/A and press the seams open. Then continue as shown in these steps, fold back each end, equally in half lengthways, with right sides together, and stitch across with 1 cm / 3/8” seam allowance. Turn out the ends neatly to the right side.


S T E P 6B : SEWING NECK BAND
ALL SIZES
Attach one edge of the neck band to the inside of the CF top, right side neck band to wrong side top, and stitch all the way around matching your SH and CB notches. The bottom edge of your neck band should match perfectly along the bottom edge of the finished hem. Now press the seams towards the body. Press the other edge of the neck band to the wrong side by 1cm / 3/8” then fold the neck band in half, to the front of the body, covering the seam slightly. Pin the neck band in place all the way around and top stitch down through all layers close to the fold.


S T E P 7 : BUTTONS & BUTTON HOLES
ALL SIZES
Place 3 buttons and button holes onto the neck band. The first button should be placed approximately 28cm / 11” down from the shoulder seam (or just below the neckband seam for the size TWO), and the remaining 2 approximately 12cm / 4.75” inch apart from each other. Make sure your buttons and button holes are centered on the neck band.

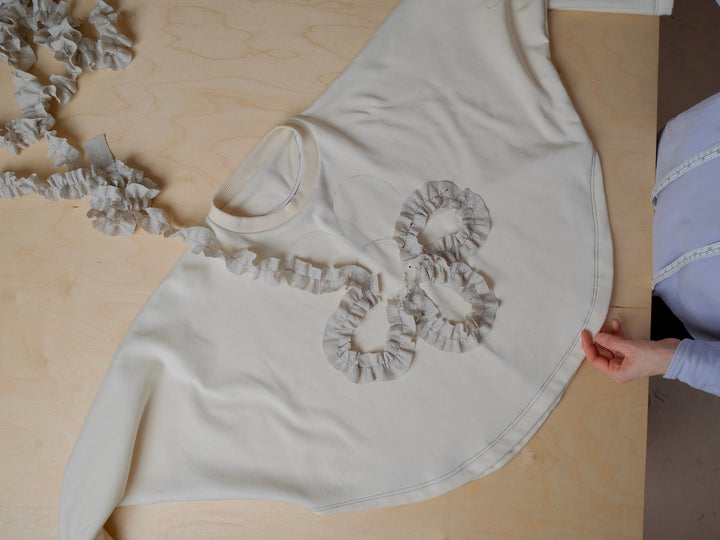
GATHER SLEEVE HACK
ADDITIONAL INSTRUCTIONS: ALL SIZES
Fold your sleeve hem bands in half widthways, right sides together, and sew the short ends. Press the seams open. Your finished sleeve circumference should be between 30cm / 12” - 35cm / 14”.


Gather the hem of your sleeve to the same size as the sleeve hem band circumference. Attach one end of the sleeve band to the inside of the sleeve (right side sleeve band to wrong side sleeve). Sew with the gathers facing up so you can neatly sew across them.


Press the sleeve band and seam allowances down. Press the other raw end of the sleeve band up into the wrong side 1cm / 3/8”, then fold the band in half all the way around, right sides together. Pin in place and top stitch down through all layers, close to the fold line. (The attachment of this band is similar to how the neck band is attached in the main instructions).